Telematics plug-in device installation

To start your participation in OReGO's road usage charging program, please plug in your device following the instructions below. Don't worry, it's very easy, take note!

Preparing For Installation

Before installing your device, please document your device serial number. You will need this information at a later time to verify your installation.

  1. Verify that we support your vehicle by carefully reading the device release notes at goo.gl/fZURff or from the vehicle-specific installation notes at goo.gl/MCIXt0. If you have any questions or concerns please consult your Partner.
  2. Ensure no dash warning lights are on in the vehicle while it is running, and all other functions such as headlamps and flashers etc. are working prior to installing the device.

WARNING! Some installations are not straightforward and must be completed by an Authorized Installer to ensure a secure installation. An unsecure device installation can cause poor electric and/or data connection that can lead to short circuits and fires or cause malfunctions of vehicle controls that can result in serious personal injury or significant damage to your vehicle. Some examples requiring professional installation from an Authorized Installer are:

  • The OBD port location is such that the device could protrude or interfere when entering or exiting the vehicle or located so could be inadvertently kicked or bumped during vehicle operation.
  • The device isn't fully secured and so may be able to vibrate loose or get kicked or knocked. 
  • An electrical harness or additional wiring is required.
  • Vehicle mounting modifications are required to secure the device (for example, removing of panels), the OBD connector has been deformed/damaged, or there is any physical damage visible to the electrical wiring.
  • The device does not beep six times and power on when first installed.
  • The installer questions their ability to complete a secure installation according to these instructions.

WARNING! Do not attempt to install, reconfigure, or remove any product from a vehicle while the vehicle is in motion or otherwise in operation. All installation, configuration, or removal must be done only in stationary vehicles which are securely parked. Attempting to service devices while the vehicle is in motion could result in malfunctions or accidents, leading to death or serious personal injury.

Installation in Four Steps

For the instructions included with the device, please visit: goo.gl/QnadCU

Based on the warnings above, if you determine that a professional installation by an Authorized Installer is not required, the following basic installation steps can be followed.

Step 1

Installation step 1 illustration how to locate the vehicle’s engine diagnostic port found in driver’s area

Step 1

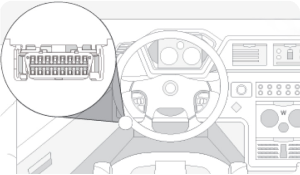
Locate the vehicle’s engine diagnostic port typically found in the driver’s area at or below knee level.

NOTE: For heavy-duty trucks, always use a vehicle-specific harness where available (see Harness Identification and Application and Harness Assessment Cheat Sheet). If a heavy-duty truck-specific harness is not offered by the device manufacturer or the vehicle manufacturer, use the adapter harness (HRN-CG13S1) for any 16-pin (OBDII) installation method to avoid possible device damage.

Step 2

Installation step 2 Align device with engine diagnostic port and push in place Ensure it's well connected to diagnostic port

Step 2

Align the receiver end of the device with the engine diagnostic port and push in place. Ensure the device is well connected to the diagnostic port. Once connected, the device emits 6 quick beeps.

Ensure there is always a 20cm separation between the driver and the device.

Step 3

Installation step 3 graphic Connect LED Device configuration Cellular network connectivity GPS network connectivity

Step 3

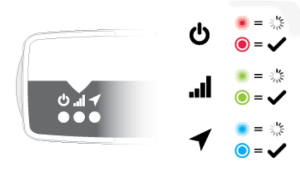
Once the device is connected and receives power, the LEDs on the front of the device start blinking then turn solid once completing the actions below.

Red LED — Device configuration

Green LED — Cellular network connectivity

Blue LED — GPS network connectivity

NOTE: The device should be in good cellular coverage during the installation process. 

Step 4

Installation step 4 graphic device set-up secure using the provided cable tie updating when green and blue LEDs turn solid

Step 4

The device emits two quick beeps every 60 seconds during set-up. Initial startup may take several minutes to complete. 

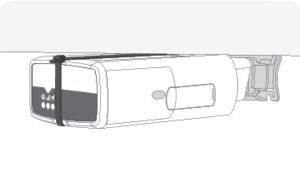
Once all three LEDs turn solid and you hear 10 quick beeps, secure the device using the provided cable tie.

NOTE: The device starts updating when the green and blue LEDs turn solid. 

WARNING! All in-vehicle devices and related cabling must be securely fastened and kept clear of all vehicle controls, including gas, brake and clutch pedals. This requires the use of a cable tie when securing the device or any extension harness to the OBD connector, securing both sides of the harness. If you do not use a cable tie, vibration in the vehicle can lead to a loose connection which could indirectly cause the vehicle’s engine computer to fail, loss of vehicle control and cause serious injury. Inspect devices and cabling regularly to ensure all devices and cabling continue to be securely attached.

WARNING! If at any point after an in-vehicle device is installed a warning light illuminates on the vehicle dash or the vehicle stalls or has a marked drop in performance, shut off the engine, remove the device, and contact your Partner. Continuing to operate a vehicle with these symptoms can cause loss of vehicle control, and serious injury.

Verify Your Installation

To check the status of the device you have installed, navigate to installmygps.com and open MyInstall (public) to verify that the device is communicating. On the web page, fill in the installer information and device serial number. In the Device status section, you will see a green box with a PASS label to indicate that your installation was successful. If you see a red box with a FAIL label, you must check the installation and try again. 

Then, provide information about the vehicle where you installed the telematics device. Once complete, click Finish installation.

Important Safety Information and Limitations of Use

WARNING! Your in-vehicle devices must be kept clear of debris, water, and other environmental contaminants. Failure to do so may result in units malfunctioning or short-circuiting, which can lead to a fire hazard and cause loss or serious injury.

NOTICE: Do not attempt to remove the devices from the vehicle in which they are originally installed for installation in another vehicle. Not all vehicles share compatibility, and doing so may result in unexpected interactions with your vehicle, including sudden loss of power or shutdown of the vehicle’s engine while in operation, or causing your vehicle to operate poorly or erratically and cause serious injury and/or vehicle damage.

NOTICE: This product does not contain any user-serviceable parts. Configuration, servicing, and repairs must only be made by an authorized reseller or installer. Unauthorized servicing of these products will void your product warranty.

FAQs

What are the benefits of opting in to the OReGO program?
Open

Here are the perks:

  • Registration fees savings for electric and 40+ miles-per-gallon rating vehicles.
  • Help preserve and maintain Oregon's roads.
  • Only pay for the miles you drive (2 cents per mile).
  • Participants with gas-powered vehicles receive a credit (40 cents per gallon) to ensure drivers pay only one fee.
Who is eligible for the OReGO program?
Open

Elegibility criteria:

  • The vehicle must be registered with the Oregon Department of Motor Vehicles (DMV).
  • Electric, hybrid, diesel and gas-powered vehicles rated at 20 miles per gallon or better, are elegible for the program.
  • The vehicle must be classified as a light-duty passenger vehicle.
  • The person enrolling in the program must be the same individual listed on the vehicle’s title.
How and when do I get the fuels tax credit?
Open

"In Oregon, fuel-powered vehicles are subject to a 40-cent-per-gallon fuels tax, which is automatically included at the pump.

When calculating your road usage charges, we automatically subtract the amount of fuels tax you've already paid—based on your vehicle’s miles-per-gallon—until reaching a zero-dollar balance. (Note: By law, fuels tax credits cannot exceed the total road usage charges.)

You can view a detailed breakdown of these calculations in your NextPass Miles account.

Will I have to pay both the per-mile charge and the fuel tax?
Open

No, you won’t be charged twice. You only pay for the miles you drive, minus the total fuel tax paid.

What happens if I drive out of state?
Open

Miles driven outside the state are exempt from the road usage charge but are subject to fuel tax.

Participants using a GPS reporting option will not pay for miles driven out of Oregon since these are automatically recongized and removed fro your invoice.

Drivers not using a GPS mileage reporting solution should submit an annual refund request directly to ODOT at MyOReGO@odot.state.or.us no later than January 15th of the follwing year (or within 15 months of the payment date).

How can I enroll in the OReGO program with NextPass Miles?
Open

To sign up for the OReGO program, click here and follow the steps.

What payment methods can I use?
Open

We accept all major credit cards for payment.

Are the payments automatically charged to my credit card?
Open

Yes. Once you've set a preferred credit card, your payments will be charged to it automatically each billing cycle.

What are the benefits of opting in to the OReGO program?
Open

Here are the perks:

  • Registration fees savings for electric and 40+ miles-per-gallon rating vehicles.
  • Help preserve and maintain Oregon's roads.
  • Only pay for the miles you drive (2 cents per mile).
  • Participants with gas-powered vehicles receive a credit (40 cents per gallon) to ensure drivers pay only one fee.
How and when do I get the fuels tax credit?
Open

"In Oregon, fuel-powered vehicles are subject to a 40-cent-per-gallon fuels tax, which is automatically included at the pump.

When calculating your road usage charges, we automatically subtract the amount of fuels tax you've already paid—based on your vehicle’s miles-per-gallon—until reaching a zero-dollar balance. (Note: By law, fuels tax credits cannot exceed the total road usage charges.)

You can view a detailed breakdown of these calculations in your NextPass Miles account.

What happens if I drive out of state?
Open

Miles driven outside the state are exempt from the road usage charge but are subject to fuel tax.

Participants using a GPS reporting option will not pay for miles driven out of Oregon since these are automatically recongized and removed fro your invoice.

Drivers not using a GPS mileage reporting solution should submit an annual refund request directly to ODOT at MyOReGO@odot.state.or.us no later than January 15th of the follwing year (or within 15 months of the payment date).

What payment methods can I use?
Open

We accept all major credit cards for payment.

Who is eligible for the OReGO program?
Open

Elegibility criteria:

  • The vehicle must be registered with the Oregon Department of Motor Vehicles (DMV).
  • Electric, hybrid, diesel and gas-powered vehicles rated at 20 miles per gallon or better, are elegible for the program.
  • The vehicle must be classified as a light-duty passenger vehicle.
  • The person enrolling in the program must be the same individual listed on the vehicle’s title.
Will I have to pay both the per-mile charge and the fuel tax?
Open

No, you won’t be charged twice. You only pay for the miles you drive, minus the total fuel tax paid.

How can I enroll in the OReGO program with NextPass Miles?
Open

To sign up for the OReGO program, click here and follow the steps.

Are the payments automatically charged to my credit card?
Open

Yes. Once you've set a preferred credit card, your payments will be charged to it automatically each billing cycle.

By continuing to use our site, you agree to our Terms and conditions . Learn more about how we use cookies by reviewing our Privacy Policy